Invite Supplier
Invite Supplier
Invite Supplier
Invite Supplier
Possible Duplicates
Update Company Details
Terms and Conditions
Available Companies
Select the listing you wish to view or edit.
Video Recommendation
Member FAQ's
This step-by-step guide will walk you through editing all the customizable sections of your listing overview page.
Section 1: Editing Company Details
The company details section includes your company description, contact information, and other business details.
Step 1. Locate the company details section on your listing overview page.
Step 2. Click the Edit icon (pencil icon) next to the company details you want to modify.
Step 3. Make your desired changes to the editable fields. Note that the company name and email address cannot be modified.
Step 4. Click the Check icon (checkmark) to save your changes.
Step 5. Verify that your changes have been successfully updated and are displaying correctly.
Section 2: Updating Company Logo
Your company logo appears prominently on your listing and helps with brand recognition.
Step 1. Navigate to the company logo section in your listing overview.
Step 2. Click on the current logo or the "Select Image" button if no logo is currently displayed.
Step 3. Choose one of the following options:
-
Upload a new image: Browse and select an image file from your computer
-
Select from existing images: Choose from previously uploaded images in your media library
Step 4. Once you've selected or uploaded your desired logo image, click the "Save" button.
Step 5. Confirm that your new logo is displaying properly on the listing.
---
Section 4: Editing Overview Text
Section 3: Updating Company Cover Image
The cover image serves as the banner for your listing and creates the first visual impression for visitors.
Step 1. Scroll to the cover image section at the top of your listing overview.
Step 2. Click on the current cover image or the "Select Image" button if no cover image is set.
Step 3. Choose your preferred option:
-
Upload a new image: Browse your computer and select a new cover image
-
Select from gallery: Choose from your existing uploaded images
Step 4. After selecting or uploading your cover image, click the "Save" button to apply the changes.
Step 5. Review your listing to ensure the new cover image displays correctly and looks professional.
---
The overview text provides a description of your company and services to potential clients.
Step 1. Locate the overview text section on your listing page.
Step 2. Click the Edit icon (pencil icon) next to your overview text.
Step 3. Update your overview text with your desired content, highlighting your company's key services, expertise, and value proposition.
Step 4. Click the Save button to save your changes.
Step 5. Review the updated overview text to ensure it displays correctly and effectively represents your business.
---
Section 5: Adding Social Media Links
Connect your social media profiles to your listing to increase engagement and provide additional ways for clients to connect with you.
Step 1. Navigate to the Social Media section on your listing overview page.
Step 2. Click the "Add Link" hypertext to add a new social media profile.
Step 3. Enter the URL of your social media profile (e.g., LinkedIn, Twitter, Facebook, Instagram).
Step 4. Select the appropriate social media platform from the dropdown menu if available.
Step 5. Click "Save" to add the social media link to your listing.
Step 6. Repeat steps 2-5 for each additional social media profile you want to include.
---
Important Notes:
-
- Non-editable fields: Company name and email address cannot be modified through the overview editing process
-
- Image requirements: Ensure your logo and cover images meet the platform's size and format requirements for optimal display
-
- Save your work: Always remember to save changes after making edits to prevent losing your modifications
-
- Preview changes: Take a moment to review how your edits appear to visitors before finalizing
-
- Social media URLs: Make sure to use complete URLs (including https://) for your social media links
Your listing overview is now updated with your changes and ready to make a great impression on potential clients and partners!
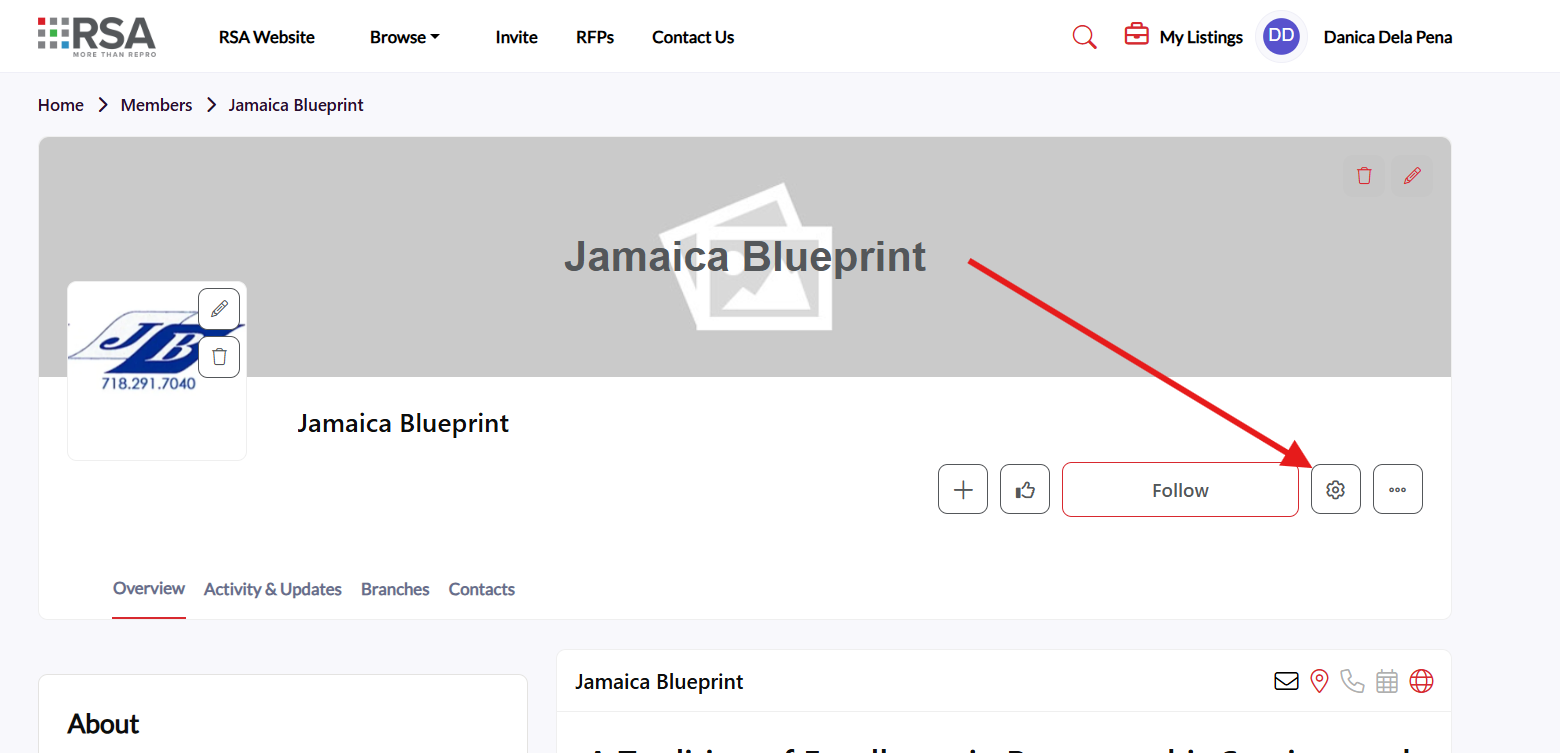
Adding relevant categories to your listing helps potential clients find your services more easily and improves your listing's visibility in search results. Follow these steps to add categories to your listing.
Step 1: Access Your Listing Settings
Navigate to your listing page and click the Gear icon (settings icon) to edit and manage your listing.
---
Step 2: Navigate to Categories Tab
Once in the settings menu, locate and click on the "Categories" tab to access the category management section.
---
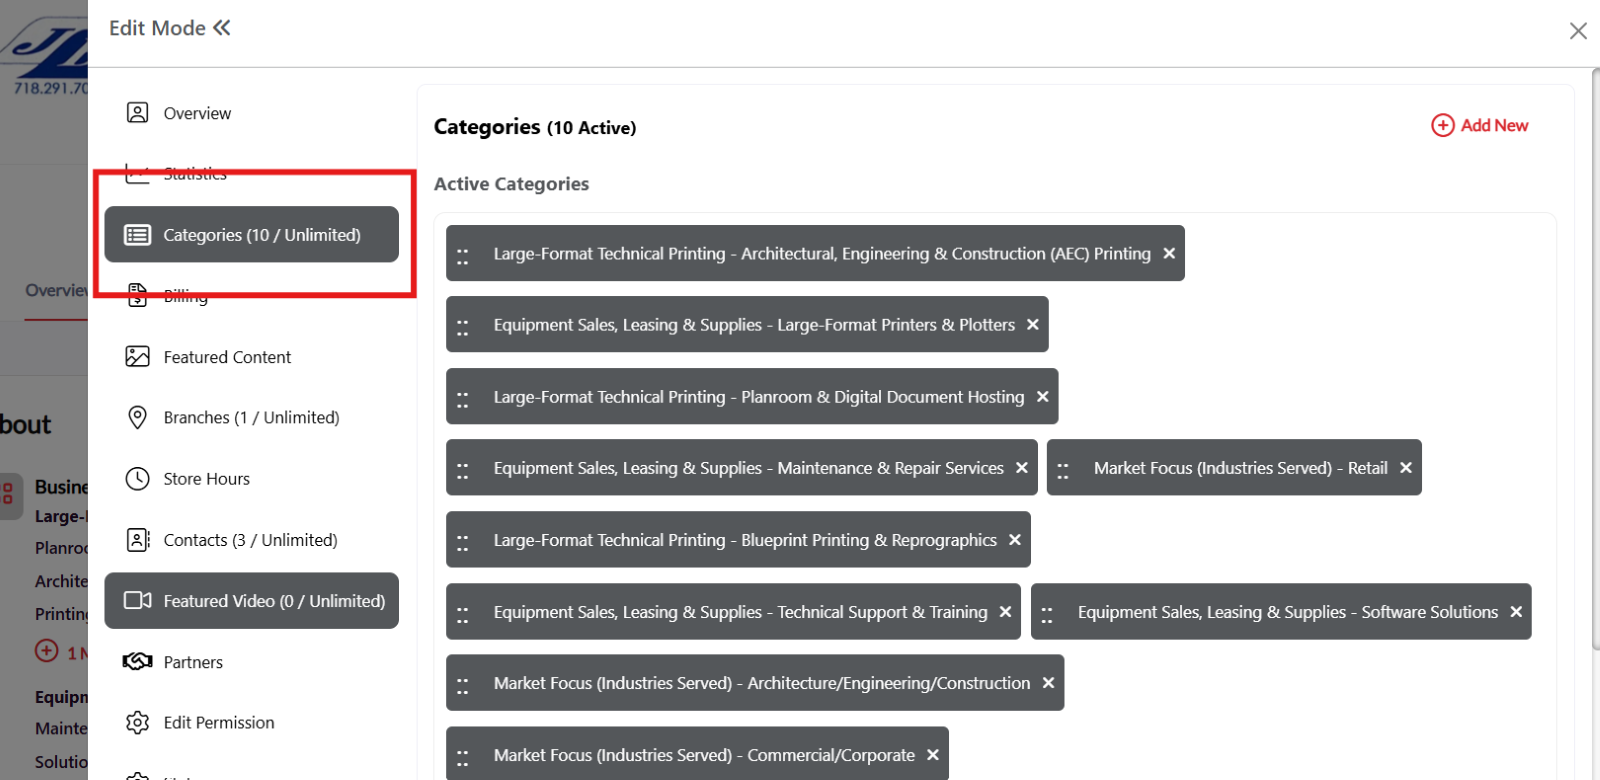
Step 3: Add New Categories
In the Categories section, click the "Add New" hyperlink text to begin adding categories to your listing.
---
Step 4: Browse Available Categories
You'll see a list of available categories displayed on the screen. Review the categories that are relevant to your business and services.
---
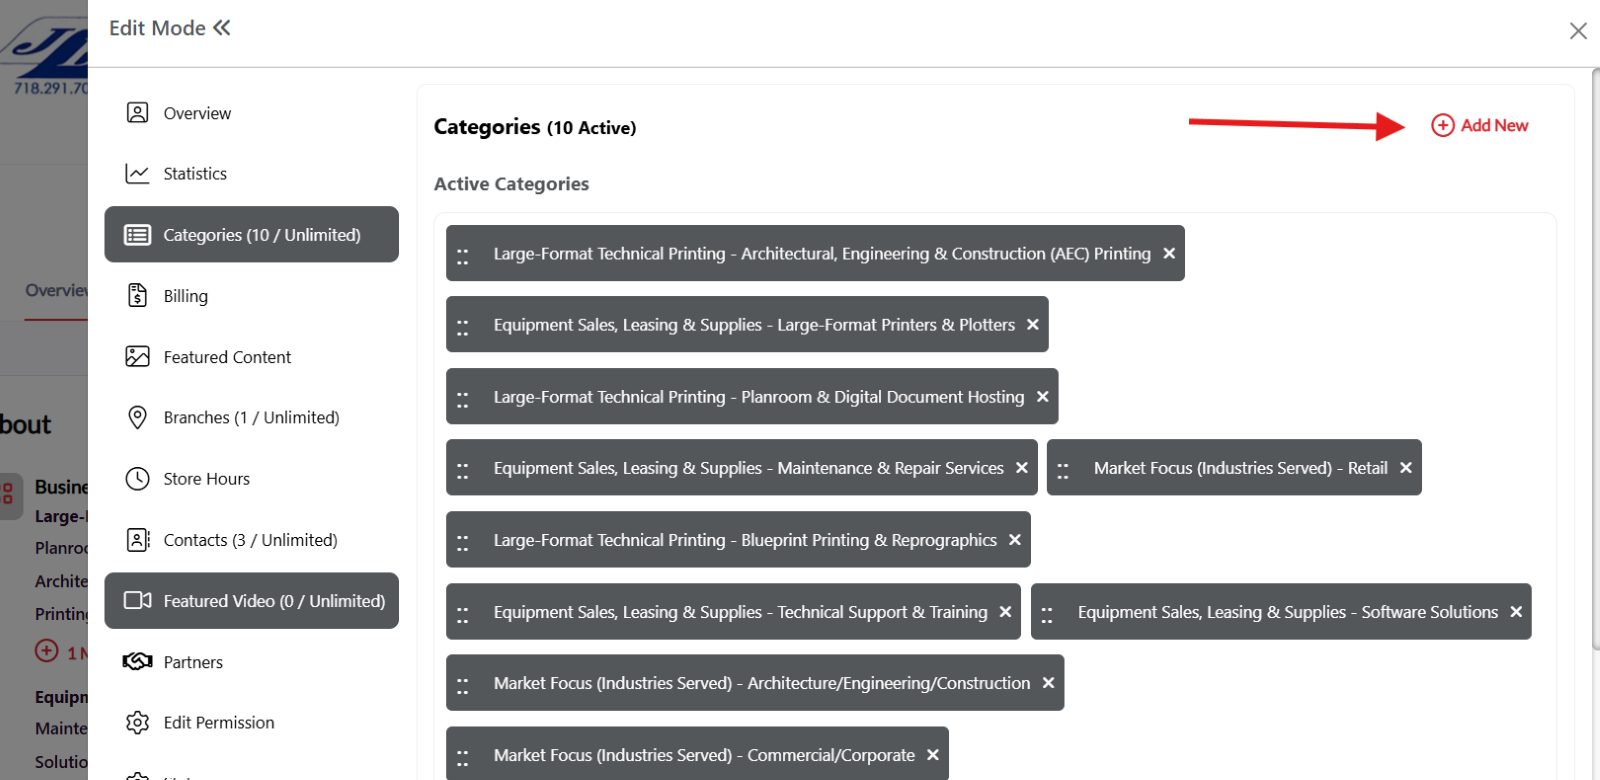
Step 5: Select Categories from the List
Method 1 - Browse and Select:
-
Scroll through the category list
-
Check the box next to each category that applies to your business
-
You can select multiple categories that are relevant to your services
---
Step 6: Search for Specific Categories (Alternative Method)
Method 2 - Use Search Function:
-
If you have specific categories in mind, use the search bar at the top of the category list
-
Type keywords related to your business or services
-
Check the box next to the relevant categories that appear in the search results
---
Step 7: Save Your Category Selections
After selecting all the relevant categories for your listing:
-
Review your selected categories to ensure they accurately represent your business
-
Click the "Save" button to add the categories to your listing
---
Step 8: Verify Categories Added
Return to your listing overview page to confirm that your selected categories are now displayed on your listing and are helping to categorize your services properly.
---
Tips for Category Selection:
-
Choose relevant categories: Select only categories that truly represent your services
-
Don't over-categorize: Focus on your primary services rather than selecting too many categories
-
Review periodically: Update your categories as your business services evolve
-
Think like your clients: Choose categories that potential clients would search for when looking for your services
Your listing is now properly categorized and more discoverable to potential clients searching for your specific services!
Note: Placeholder text for images - actual screenshots should be inserted at each marked location showing the specific interface elements mentioned in each step.
Adding contacts to your listing makes it easier for potential clients to connect with the right person at your organization. Follow these steps to add and manage contacts on your listing.
Step 1: Access Your Listing Settings
Navigate to your listing page and click the Gear icon (settings icon) to edit and manage your listing.
Step 2: Navigate to Contacts Tab
Once in the settings menu, locate and click on the "Contacts" tab to access the contact management section.
Step 3: Start Adding New Contact
In the Contacts section, click the "Add New" hyperlink text to begin adding a new contact to your listing.
Step 4: Enter Email Address
A pop-up window will appear requesting the contact's email address.
Step 4a: Type the email address of the contact you want to add.
Step 4b: Click "Save" to proceed to the next step.
Step 5: Complete Contact Information
After saving the email, you'll be redirected to another pop-up window where you can add additional contact details.
Fill out the following information:
Step 5a: Phone Number Enter the contact's business phone number.
Step 5b: First and Last Name Add the contact's first name and last name in the respective fields.
Step 5c: Location Select or enter the location where this contact is based.
Step 5d: Company Name Enter the company name (this may auto-populate with your listing's company name).
Step 5e: Job Title Add the contact's job title or position within the company.
Step 5f: Book Appointment/Scheduler URL (Optional) If this contact has a scheduling system, add the URL for booking appointments.
Step 6: Save Contact Information
After completing all the contact information, click "Save Contact" to add the contact to your listing.
Step 7: Manage Existing Contacts
Once contacts are added, you can manage them from the Contacts tab using the three-dot menu.
Contact Management Options:
Step 7a: Access Contact Options Click the three dots on the right side of any contact information to access management options.
Step 7b: Edit Contact Record Select "Edit" to modify the contact's information.
Step 7c: Make Admin Select "Make Admin" to give this contact administrative privileges for the listing.
Step 7d: Pin to Top Select "Pin to Top" to prioritize this contact by displaying them at the top of your contact list.
Step 8: Verify Contact Display
Check your public listing to ensure your contacts are displaying correctly and in the desired order.
Best Practices for Contact Management:
Contact Information Tips:
-
Complete Profiles: Fill out all relevant fields for each contact
-
Professional Details: Use business phone numbers and professional email addresses
-
Clear Job Titles: Use descriptive titles that help clients understand each contact's role
-
Current Information: Keep contact details up-to-date
Contact Organization:
-
Pin Key Contacts: Pin your primary contacts to the top for easy access
-
Admin Rights: Only assign admin privileges to trusted team members
-
Strategic Ordering: Organize contacts based on client interaction priority
-
Regular Reviews: Periodically review and update your contact list
Appointment Scheduling:
-
Booking URLs: Include scheduler links for contacts who handle appointments
-
Clear Availability: Ensure scheduling systems reflect accurate availability
-
Integration: Use scheduling tools that integrate well with your workflow
Your contacts are now successfully added to your listing and will help facilitate better communication between your team and potential clients!
Adding featured content to your listing helps showcase your expertise, case studies, whitepapers, and other valuable resources to potential clients. Follow these steps to add featured content to your Insight Guide listing.
Step 1: Access Your Listing Settings
Navigate to your listing page and click the Gear icon (settings icon) to edit and manage your listing.
Step 2: Navigate to Featured Content Tab
Once in the settings menu, locate and click on the "Featured Content" tab to access the content management section.
Step 3: Start Adding Featured Content
In the Featured Content section, click the "Add Featured Content" button to begin creating new content for your listing.
Step 4: Complete Content Information Form
A pop-up window will appear with a form to fill out your content details. Complete all required fields:
Step 4a: Add Headline/Title
Enter a compelling headline or title for your featured content that clearly describes what you're sharing.
[Image: Screenshot showing the Headline/Title input field]
Step 4b: Select Type of Content
Choose the appropriate content type from the dropdown menu (e.g., Case Study, Whitepaper, Article, Video, etc.).
Step 4c: Upload Content Image
Click to upload an image that represents your content. This image will be displayed as a thumbnail for your featured content.
Step 4d: Add Overview
Write a brief overview or description of your content that explains its value and what readers can expect.
Step 4e: Upload Files/Set Destination
Choose how you want to share your content by selecting one of the following options:
-
Upload File: Upload a document, PDF, or other file directly
-
Embed Code: Paste embed code for videos or interactive content
-
URL: Provide a link to external content
Step 5: Proceed to Next Step
After completing all the content information, click the "Next" button to proceed to category selection.
[Image: Screenshot showing the completed form with Next button highlighted]
Step 6: Select Content Categories
On the next screen, you'll see category selection options to help organize and categorize your featured content.
Step 6a: Browse through the available categories and select the ones that best match your content.
Step 6b: Check the boxes next to relevant categories to help users find your content more easily.
[Image: Screenshot showing the category selection interface with checkboxes]
Step 7: Submit Your Featured Content
After selecting the appropriate categories:
Step 7a: Review all your entered information to ensure accuracy.
Step 7b: Click the "Submit" button to add the featured content to your listing.
Step 8: Verify Content Addition
Return to your Featured Content tab or listing overview to confirm that your new featured content has been successfully added and is displaying properly.
Best Practices for Featured Content:
-
Compelling Headlines: Use clear, descriptive titles that grab attention
-
High-Quality Images: Upload professional, relevant images for better visual appeal
-
Detailed Overviews: Write informative descriptions that highlight the value of your content
-
Proper Categorization: Select accurate categories to improve discoverability
-
Regular Updates: Keep your featured content fresh and current
-
Value-Focused: Share content that demonstrates your expertise and provides value to potential clients
Content Types You Can Feature:
-
Case studies and success stories
-
Whitepapers and research reports
-
Industry insights and articles
-
Video presentations and demos
-
Infographics and visual resources
-
Webinar recordings
-
Product documentation
-
Testimonials and reviews
Your featured content is now live on your Insight Guide listing and will help demonstrate your expertise to potential clients!
Note: Placeholder text for images - actual screenshots should be inserted at each marked location showing the specific interface elements mentioned in each step.
Adding multiple locations or branches to your listing helps potential clients find your services in their area and demonstrates your business reach. Follow these steps to add locations/branches to your listing.
Step 1: Access Your Listing Settings
Navigate to your listing page and click the Gear icon (settings icon) to edit and manage your listing.
Step 2: Navigate to Locations/Branches Tab
Once in the settings menu, locate and click on the "Locations/Branches" tab to access the location management section.
Step 3: Start Adding New Location
In the Locations/Branches section, click the "Add New" hyperlink text to begin adding a new location or branch to your listing.
Step 4: Complete Location Information
A pop-up window will appear allowing you to add your location/branch details.
Step 4a: Select Country
Click on the country dropdown menu and select the country where your location/branch is situated.
Step 5: Search and Select Address
Step 5a: Search for Address
In the address search field, start typing the address of your location/branch. The system will provide suggestions as you type.
Step 5b: Select Correct Address
From the dropdown suggestions that appear, click on the correct address that matches your location/branch.
Step 6: Save Location
After selecting the correct address, click the "Save" button to add the location/branch to your listing.
Step 7: Verify Location Addition
Return to your Locations/Branches tab to confirm that your new location has been successfully added and is displaying with the correct address information.
[Image: Screenshot showing the newly added location in the Locations/Branches list]
Step 8: Add Additional Locations (Optional)
To add more locations or branches, repeat steps 3-6 for each additional location you want to include in your listing.
Step 9: View on Listing
Check your public listing to see how your locations/branches are displayed to potential clients.
Tips for Adding Locations:
-
Accurate Addresses: Ensure you select the exact address to help clients find you easily
-
Complete Information: Add all your business locations to show your full service area
-
Verify Details: Double-check that each location displays correctly on your listing
-
Regular Updates: Keep your locations current if you open new branches or close existing ones
-
Strategic Locations: Include all locations where you provide services or have physical presence
Benefits of Adding Multiple Locations:
-
Improved Local Search: Better visibility in location-based searches
-
Client Convenience: Helps clients find the nearest location to them
-
Business Credibility: Demonstrates your business scope and presence
-
Geographic Coverage: Shows the areas you serve
-
Enhanced Discoverability: Increases chances of being found by local clients
Your locations/branches are now successfully added to your listing and will help potential clients find and connect with your business in their area!
Vendor FAQ's
Our Rating's Promise:
We won't publish ratings or share any individual ratings with any supplier. We will only share aggregated data (averages etc) with suppliers to help them improve their service.
Why do we ask for ratings?
Ratings are confidential and we don’t share any individual ratings with suppliers. As an association, one of our goals is to work with our industry suppliers to help improve quality within our industry.
What do we do with the rating information?
We do NOT publish any rating information. We use the aggregated data to provide quantifiable data back to industry suppliers to help them improve their respective products and services.
For example, if a supplier had received 100 ratings for their support and their average rating was 4.1 out of 5, we would simply tell the supplier that their average member rating for service was 4.1 out of 5, based on approx.. 100 members.
Future Possibilities:
In the future, we may be able to provide additional data to help them improve their service. For example, we could provide them with their average score based on members who are new vs. experienced with their software, or we may provide trending data such as telling them that they have improved their service rating by 15% over the past 6 months.
What happens to recommendations or constructive feedback?
If a member gives a high Net Promoter Score (re. the likelihood to recommend), then we ask for a recommendation. Any recommendations are published on the supplier’s listing. On the other hand, if a member gives a low Net Promoter Score, then we ask for some constructive feedback that we can pass on, anonymously to the supplier.
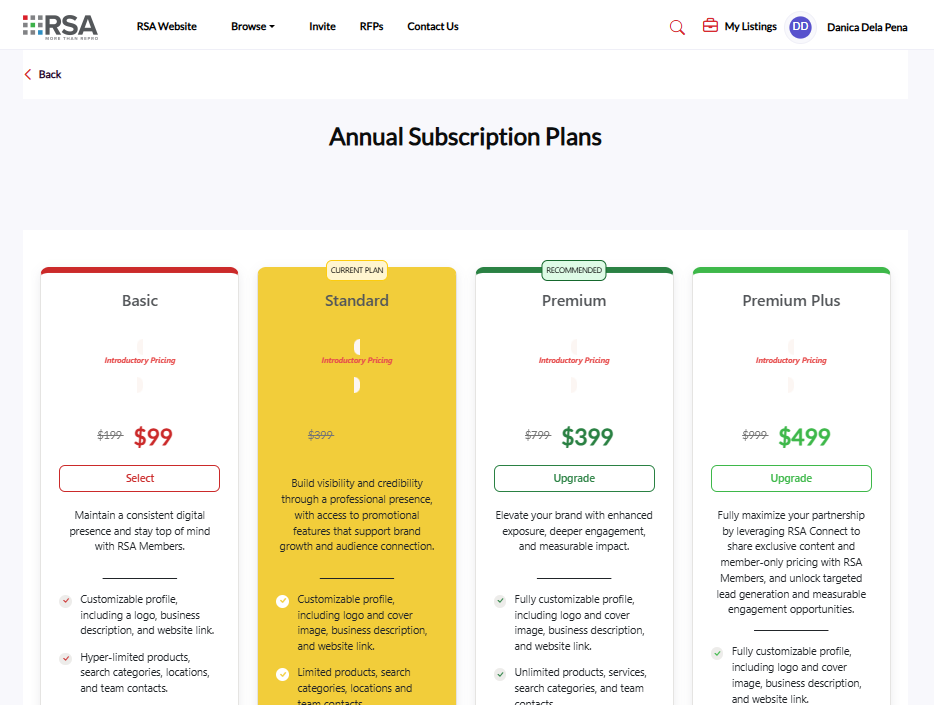
Upgrading your listing gives you access to enhanced features and greater visibility. Follow these steps to upgrade your listing plan.
Step 1: Access Your Listing Settings
Navigate to your listing page and click the Gear icon (settings icon) to edit and manage your listing.

Step 2: Navigate to Billing Tab
Once in the settings menu, locate and click on the "Billing" tab to access your billing and subscription options.
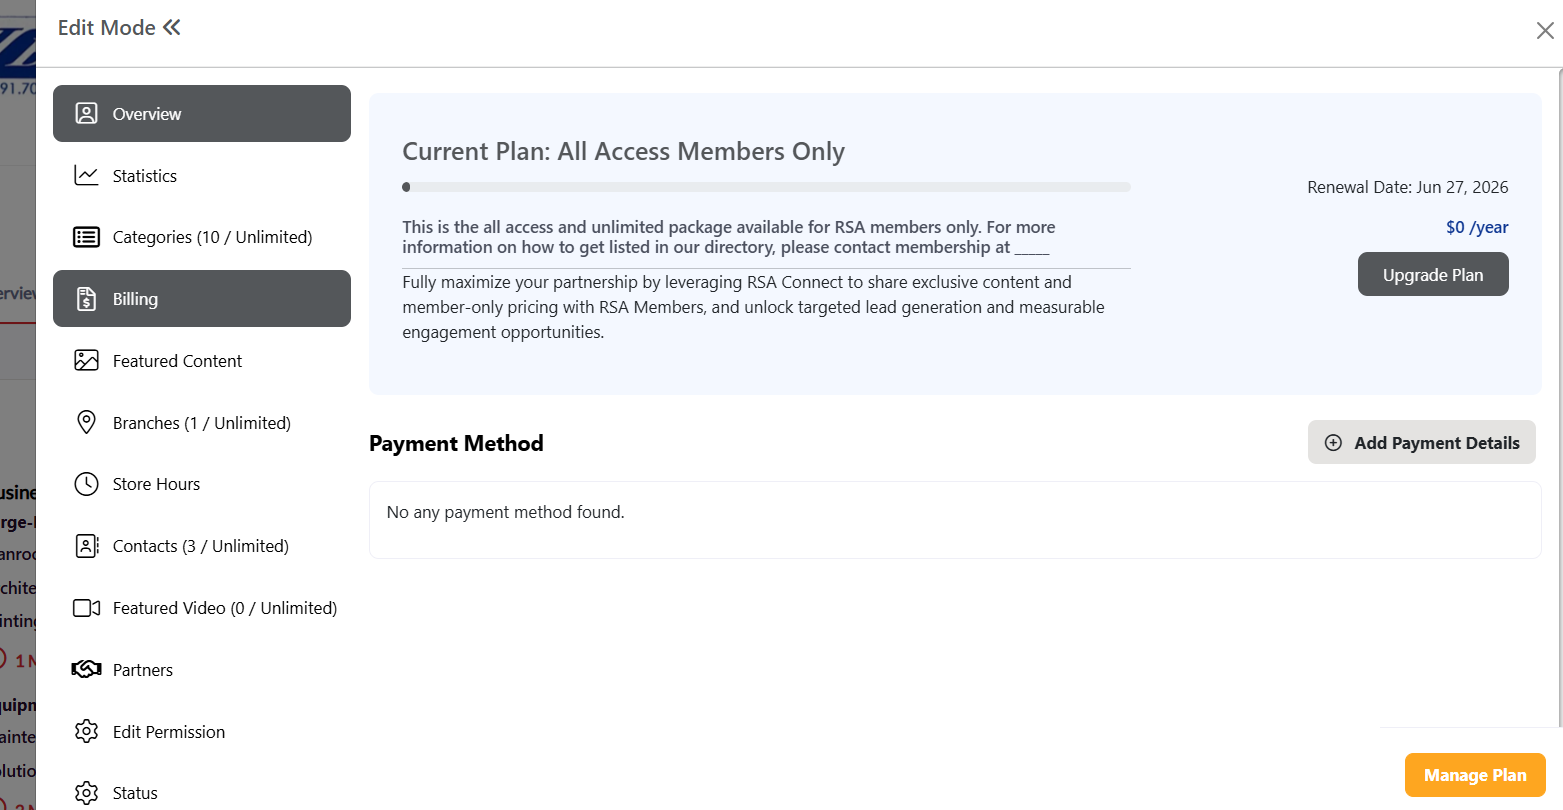
Step 3: Add Payment Method
If you don't have a payment method on file, you'll need to add one before upgrading.
Step 3a: Click the "Add Payment Method" button in the billing section.
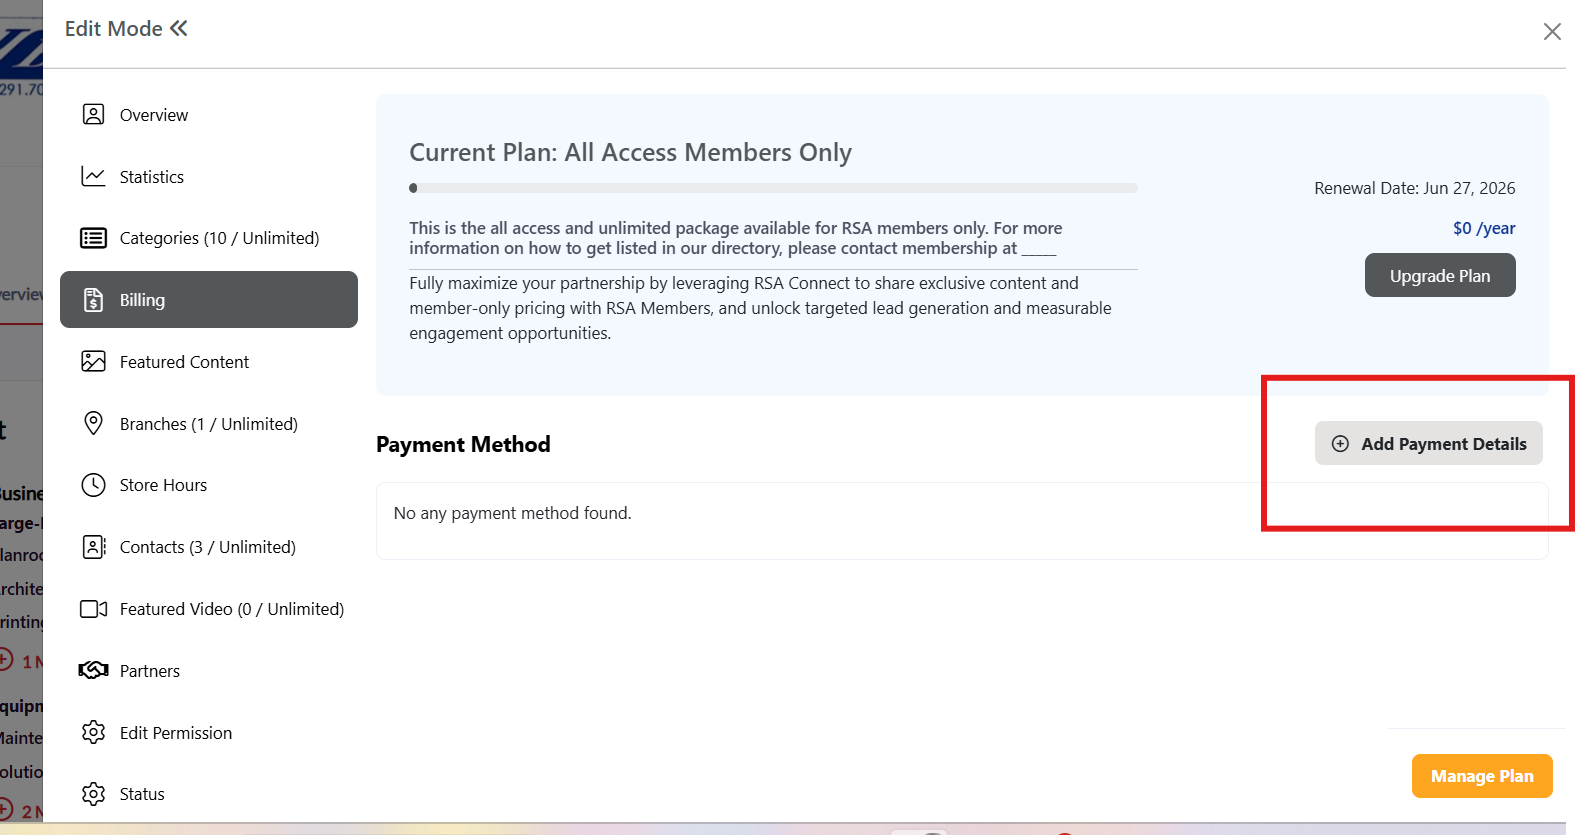
Step 3b: A pop-up window will appear requesting your card information. Fill out all required fields:
-
Card number
-
Expiration date
-
CVV/Security code
-
Cardholder name
-
Billing address
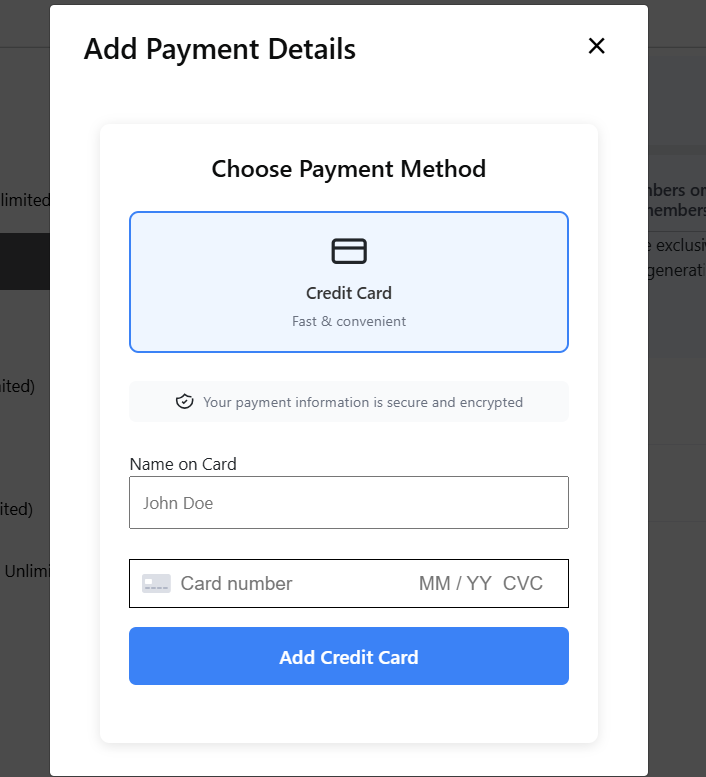
Step 3c: Click "Add Credit Card" to add your payment method to your account.
Step 4: Click Upgrade Plan Button
Once your payment method is added, click the "Upgrade Plan" button to view available subscription options.
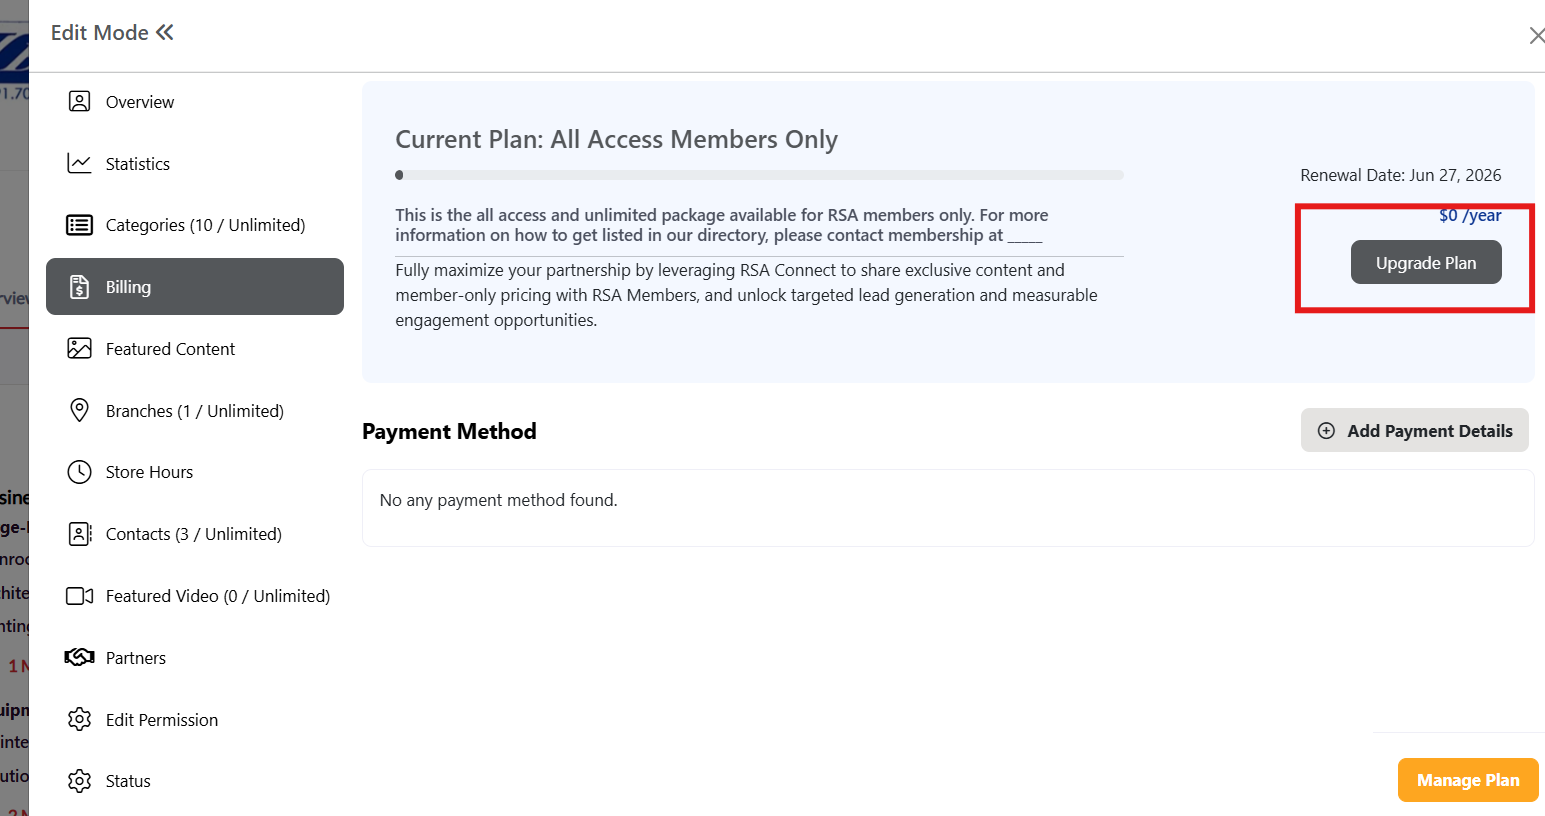
Step 5: Select Your New Plan
You'll be redirected to a page displaying all available subscription plans. Your current plan will be highlighted.
Step 5a: Review the available plans and their features.
Step 5b: To upgrade, click the "Upgrade" button on a plan that is higher than your current plan.
Step 6: Review Plan Details and Options
A pop-up window will appear with detailed information about your selected plan.
Step 6a: Review the plan information and features included.
Step 6b: Add Coupon Code (Optional): If you have a coupon code, enter it in the designated coupon code area.
Step 6c: Add New Payment Method (Optional): If you want to use a different payment method, click "Add New Card" to enter alternative payment information.
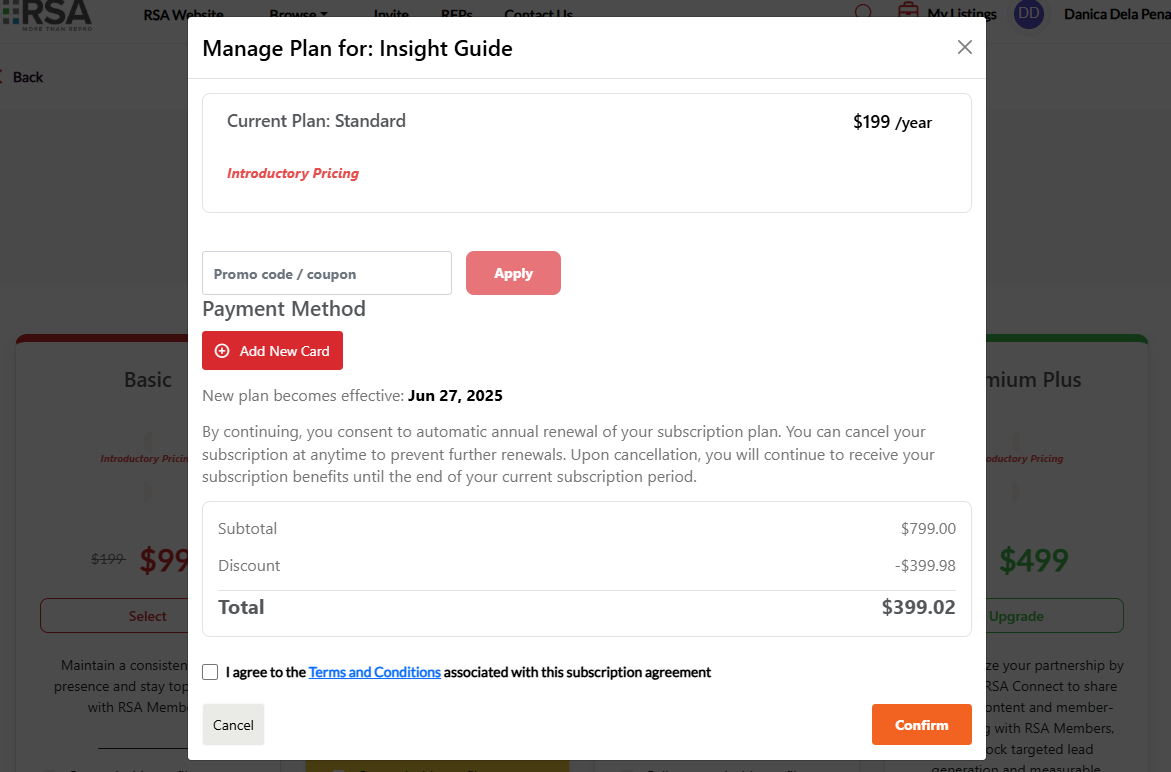
Step 7: Review Total Price
Check the total price displayed for your selected plan, including any discounts from coupon codes.
Step 8: Accept Terms and Conditions
Before confirming your upgrade, you must check the box to accept the Terms and Conditions.
Step 9: Confirm Your Upgrade
After reviewing all details and accepting the terms:
-
Verify all information is correct
-
Click the "Confirm" or "Subscribe" button to complete your upgrade
[Image: Screenshot showing the final confirmation button]
Step 10: Upgrade Confirmation
Once your upgrade is processed, you'll receive confirmation that your plan has been successfully upgraded, and you'll have immediate access to your new plan's features.
[Image: Screenshot showing upgrade confirmation message]
Important Notes:
-
Payment processing: Your card will be charged immediately upon confirmation
-
Plan activation: New features are typically available immediately after upgrade
-
Billing cycle: Your new plan billing cycle begins from the upgrade date
-
Cancellation: Review the cancellation policy in the terms and conditions
-
Support: Contact customer support if you encounter any issues during the upgrade process
Congratulations! Your listing has been successfully upgraded and you now have access to enhanced features to better showcase your business.
How to Claim a Listing
Claiming a listing is a simple process that allows you to manage and update your company’s information. Follow these quick steps to manage your listing.
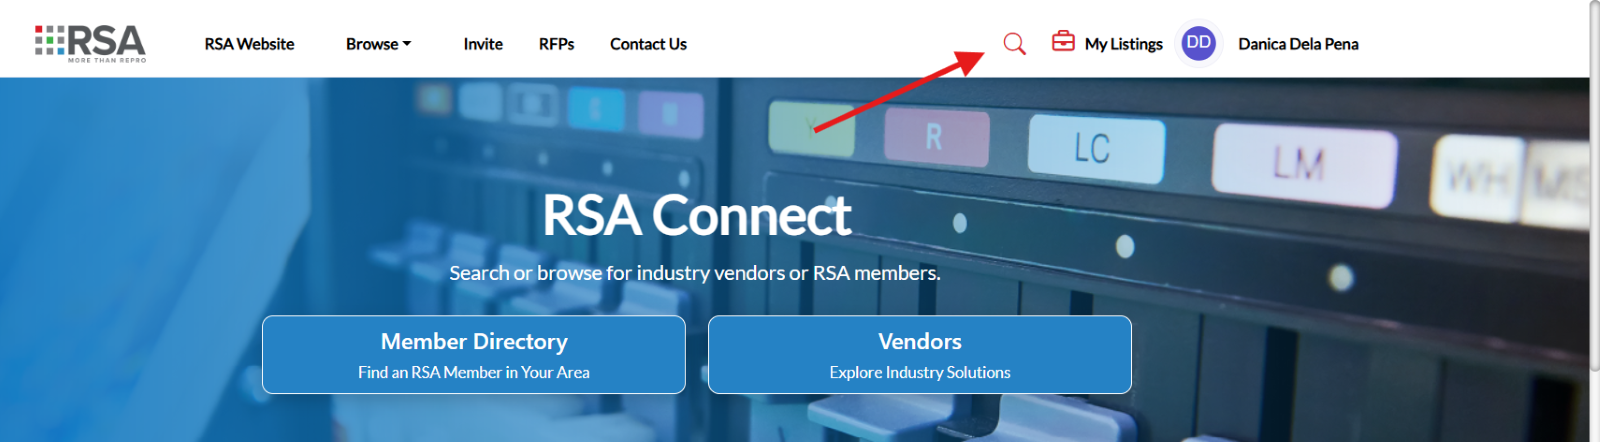
1. Find Your Listing
Use the search bar to find your business listing by name. Select your listing card to view its full details.
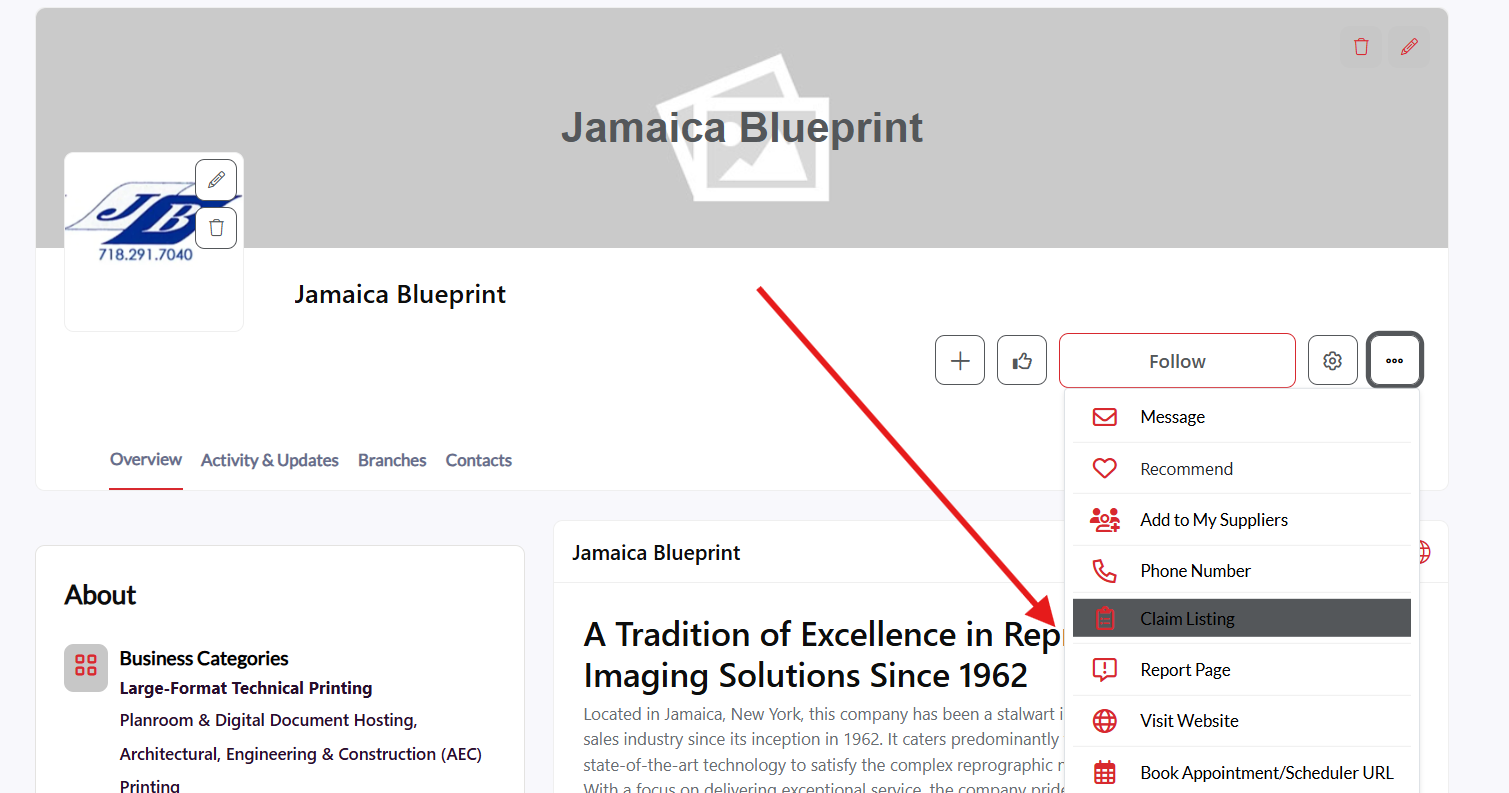
2. Find the Claim Your Listing Menu
On your listing page, look for the three-dot menu icon. Click on this menu to reveal a dropdown.

3. Claim Your Listing
From the dropdown, select Claim Listing. A confirmation pop-up will appear informing you that you will become the listing contact.
4. Confirm Your Claim
In the pop-up window, Confirm to complete the claim process.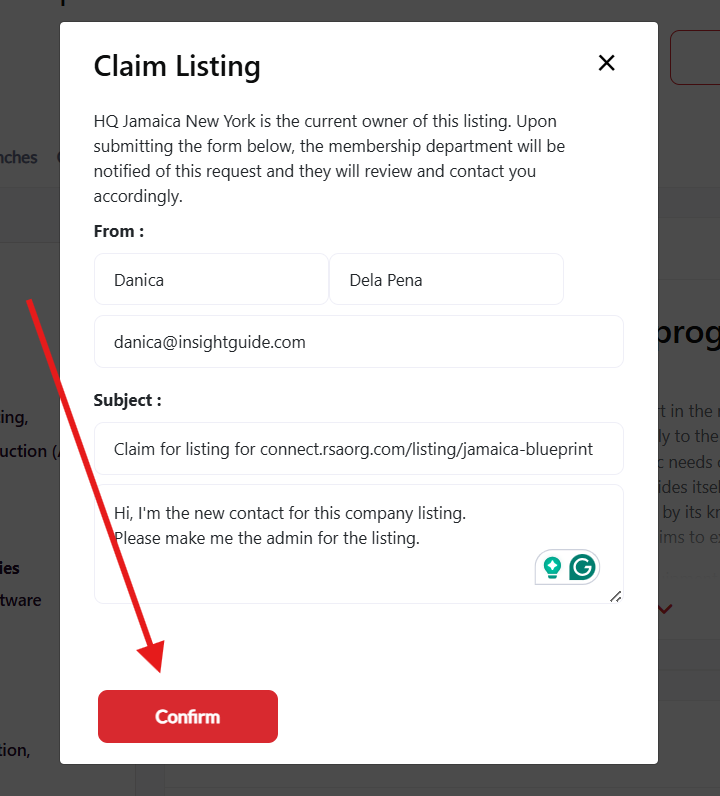
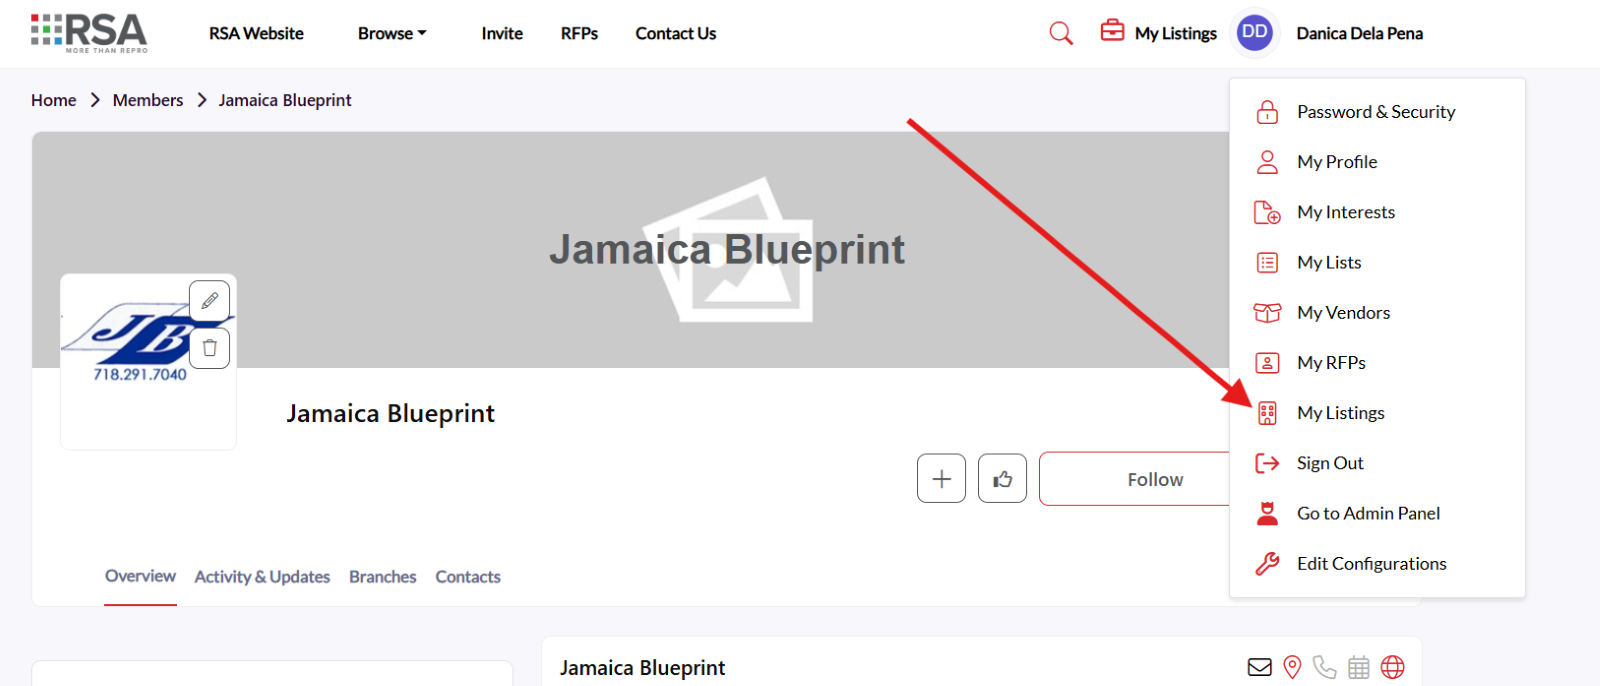
5. View Your Claimed Listings
To manage your claimed listing, click on your profile icon at the top right corner of the page. From the dropdown, select My Listings to view and manage all listings you’ve claimed.
6. Edit and Manage Your Listing
To edit, manage your subscription, view insights and all the details of your listing, select the gear icon on your listing page.

Managing your listing includes:
Overview
Edit your company’s profile information including the logo, text description, cover image, social media, main contact, location, etc.
Statistics
View your listing quality score and get tips on how to improve your score for engagement and visibility.
Categories
Categories help users find your company via the category search. RFPs are also disseminated to respective categories. The more categories you have, the more likely users are to find your company and the more RFPs you are likely to receive.
Billing
View and manage your listing’s subscription plan. The higher the plan, the more benefits you receive.
Featured Content
If your plan allows you content credits, you are able to post content in the form of articles, case study, event or event recording, white paper, press release or research survey. Publishing content allows added visibility to your listing and generates leads directly to you for all downloads. Though content can be added at any time, there are 20 days between when content can be published.
Locations
Determine your listing headquarters and drag and drop active locations.
Contacts
Allow users to contact you directly via email, phone, scheduler or location. Create new or drag and drop to determine the list of contacts that display on your listing.
Member Pricing & Resources
Offer exclusive pricing or resources to RSA members. Those who access your perks must agree to share their contact information with you. Set your own terms and conditions and expiration date. From this area you can also View the History of anyone who has downloaded the information.
Featured Video
Upload or use an embed code to add a featured marketing video to your listing profile.
This step-by-step guide will walk you through editing all the customizable sections of your listing overview page.
Section 1: Editing Company Details
The company details section includes your company description, contact information, and other business details.
Step 1. Locate the company details section on your listing overview page.
Step 2. Click the Edit icon (pencil icon) next to the company details you want to modify.
Step 3. Make your desired changes to the editable fields. Note that the company name and email address cannot be modified.
Step 4. Click the Check icon (checkmark) to save your changes.
Step 5. Verify that your changes have been successfully updated and are displaying correctly.
Section 2: Updating Company Logo
Your company logo appears prominently on your listing and helps with brand recognition.
Step 1. Navigate to the company logo section in your listing overview.
Step 2. Click on the current logo or the "Select Image" button if no logo is currently displayed.
Step 3. Choose one of the following options:
-
Upload a new image: Browse and select an image file from your computer
-
Select from existing images: Choose from previously uploaded images in your media library
Step 4. Once you've selected or uploaded your desired logo image, click the "Save" button.
Step 5. Confirm that your new logo is displaying properly on the listing.
---
Section 4: Editing Overview Text
Section 3: Updating Company Cover Image
The cover image serves as the banner for your listing and creates the first visual impression for visitors.
Step 1. Scroll to the cover image section at the top of your listing overview.
Step 2. Click on the current cover image or the "Select Image" button if no cover image is set.
Step 3. Choose your preferred option:
-
Upload a new image: Browse your computer and select a new cover image
-
Select from gallery: Choose from your existing uploaded images
Step 4. After selecting or uploading your cover image, click the "Save" button to apply the changes.
Step 5. Review your listing to ensure the new cover image displays correctly and looks professional.
---
The overview text provides a description of your company and services to potential clients.
Step 1. Locate the overview text section on your listing page.
Step 2. Click the Edit icon (pencil icon) next to your overview text.
Step 3. Update your overview text with your desired content, highlighting your company's key services, expertise, and value proposition.
Step 4. Click the Save button to save your changes.
Step 5. Review the updated overview text to ensure it displays correctly and effectively represents your business.
---
Section 5: Adding Social Media Links
Connect your social media profiles to your listing to increase engagement and provide additional ways for clients to connect with you.
Step 1. Navigate to the Social Media section on your listing overview page.
Step 2. Click the "Add Link" hypertext to add a new social media profile.
Step 3. Enter the URL of your social media profile (e.g., LinkedIn, Twitter, Facebook, Instagram).
Step 4. Select the appropriate social media platform from the dropdown menu if available.
Step 5. Click "Save" to add the social media link to your listing.
Step 6. Repeat steps 2-5 for each additional social media profile you want to include.
---
Important Notes:
-
- Non-editable fields: Company name and email address cannot be modified through the overview editing process
-
- Image requirements: Ensure your logo and cover images meet the platform's size and format requirements for optimal display
-
- Save your work: Always remember to save changes after making edits to prevent losing your modifications
-
- Preview changes: Take a moment to review how your edits appear to visitors before finalizing
-
- Social media URLs: Make sure to use complete URLs (including https://) for your social media links
Your listing overview is now updated with your changes and ready to make a great impression on potential clients and partners!
Adding relevant categories to your listing helps potential clients find your services more easily and improves your listing's visibility in search results. Follow these steps to add categories to your listing.
Step 1: Access Your Listing Settings
Navigate to your listing page and click the Gear icon (settings icon) to edit and manage your listing.
---
Step 2: Navigate to Categories Tab
Once in the settings menu, locate and click on the "Categories" tab to access the category management section.
---
Step 3: Add New Categories
In the Categories section, click the "Add New" hyperlink text to begin adding categories to your listing.
---
Step 4: Browse Available Categories
You'll see a list of available categories displayed on the screen. Review the categories that are relevant to your business and services.
---
Step 5: Select Categories from the List
Method 1 - Browse and Select:
-
Scroll through the category list
-
Check the box next to each category that applies to your business
-
You can select multiple categories that are relevant to your services
---
Step 6: Search for Specific Categories (Alternative Method)
Method 2 - Use Search Function:
-
If you have specific categories in mind, use the search bar at the top of the category list
-
Type keywords related to your business or services
-
Check the box next to the relevant categories that appear in the search results
---
Step 7: Save Your Category Selections
After selecting all the relevant categories for your listing:
-
Review your selected categories to ensure they accurately represent your business
-
Click the "Save" button to add the categories to your listing
---
Step 8: Verify Categories Added
Return to your listing overview page to confirm that your selected categories are now displayed on your listing and are helping to categorize your services properly.
---
Tips for Category Selection:
-
Choose relevant categories: Select only categories that truly represent your services
-
Don't over-categorize: Focus on your primary services rather than selecting too many categories
-
Review periodically: Update your categories as your business services evolve
-
Think like your clients: Choose categories that potential clients would search for when looking for your services
Your listing is now properly categorized and more discoverable to potential clients searching for your specific services!
Note: Placeholder text for images - actual screenshots should be inserted at each marked location showing the specific interface elements mentioned in each step.
Adding contacts to your listing makes it easier for potential clients to connect with the right person at your organization. Follow these steps to add and manage contacts on your listing.
Step 1: Access Your Listing Settings
Navigate to your listing page and click the Gear icon (settings icon) to edit and manage your listing.
Step 2: Navigate to Contacts Tab
Once in the settings menu, locate and click on the "Contacts" tab to access the contact management section.
Step 3: Start Adding New Contact
In the Contacts section, click the "Add New" hyperlink text to begin adding a new contact to your listing.
Step 4: Enter Email Address
A pop-up window will appear requesting the contact's email address.
Step 4a: Type the email address of the contact you want to add.
Step 4b: Click "Save" to proceed to the next step.
Step 5: Complete Contact Information
After saving the email, you'll be redirected to another pop-up window where you can add additional contact details.
Fill out the following information:
Step 5a: Phone Number Enter the contact's business phone number.
Step 5b: First and Last Name Add the contact's first name and last name in the respective fields.
Step 5c: Location Select or enter the location where this contact is based.
Step 5d: Company Name Enter the company name (this may auto-populate with your listing's company name).
Step 5e: Job Title Add the contact's job title or position within the company.
Step 5f: Book Appointment/Scheduler URL (Optional) If this contact has a scheduling system, add the URL for booking appointments.
Step 6: Save Contact Information
After completing all the contact information, click "Save Contact" to add the contact to your listing.
Step 7: Manage Existing Contacts
Once contacts are added, you can manage them from the Contacts tab using the three-dot menu.
Contact Management Options:
Step 7a: Access Contact Options Click the three dots on the right side of any contact information to access management options.
Step 7b: Edit Contact Record Select "Edit" to modify the contact's information.
Step 7c: Make Admin Select "Make Admin" to give this contact administrative privileges for the listing.
Step 7d: Pin to Top Select "Pin to Top" to prioritize this contact by displaying them at the top of your contact list.
Step 8: Verify Contact Display
Check your public listing to ensure your contacts are displaying correctly and in the desired order.
Best Practices for Contact Management:
Contact Information Tips:
-
Complete Profiles: Fill out all relevant fields for each contact
-
Professional Details: Use business phone numbers and professional email addresses
-
Clear Job Titles: Use descriptive titles that help clients understand each contact's role
-
Current Information: Keep contact details up-to-date
Contact Organization:
-
Pin Key Contacts: Pin your primary contacts to the top for easy access
-
Admin Rights: Only assign admin privileges to trusted team members
-
Strategic Ordering: Organize contacts based on client interaction priority
-
Regular Reviews: Periodically review and update your contact list
Appointment Scheduling:
-
Booking URLs: Include scheduler links for contacts who handle appointments
-
Clear Availability: Ensure scheduling systems reflect accurate availability
-
Integration: Use scheduling tools that integrate well with your workflow
Your contacts are now successfully added to your listing and will help facilitate better communication between your team and potential clients!
Adding featured content to your listing helps showcase your expertise, case studies, whitepapers, and other valuable resources to potential clients. Follow these steps to add featured content to your Insight Guide listing.
Step 1: Access Your Listing Settings
Navigate to your listing page and click the Gear icon (settings icon) to edit and manage your listing.
Step 2: Navigate to the Featured Content Tab
Once in the settings menu, locate and click on the "Featured Content" tab to access the content management section.
Step 3: Start Adding Featured Content
In the Featured Content section, click the "Add Featured Content" button to begin creating new content for your listing.
Step 4: Complete Content Information Form
A pop-up window will appear with a form to fill out your content details. Complete all required fields:
Step 4a: Add Headline/Title
Enter a compelling headline or title for your featured content that clearly describes what you're sharing.
[Image: Screenshot showing the Headline/Title input field]
Step 4b: Select Type of Content
Choose the appropriate content type from the dropdown menu (e.g., Case Study, Whitepaper, Article, Video, etc.).
Step 4c: Upload Content Image
Click to upload an image that represents your content. This image will be displayed as a thumbnail for your featured content.
Step 4d: Add Overview
Write a brief overview or description of your content that explains its value and what readers can expect.
Step 4e: Upload Files/Set Destination
Choose how you want to share your content by selecting one of the following options:
-
Upload File: Upload a document, PDF, or other file directly
-
Embed Code: Paste embed code for videos or interactive content
-
URL: Provide a link to external content
Step 5: Proceed to Next Step
After completing all the content information, click the "Next" button to proceed to category selection.
[Image: Screenshot showing the completed form with Next button highlighted]
Step 6: Select Content Categories
On the next screen, you'll see category selection options to help organize and categorize your featured content.
Step 6a: Browse through the available categories and select the ones that best match your content.
Step 6b: Check the boxes next to relevant categories to help users find your content more easily.
[Image: Screenshot showing the category selection interface with checkboxes]
Step 7: Submit Your Featured Content
After selecting the appropriate categories:
Step 7a: Review all your entered information to ensure accuracy.
Step 7b: Click the "Submit" button to add the featured content to your listing.
Step 8: Verify Content Addition
Return to your Featured Content tab or listing overview to confirm that your new featured content has been successfully added and is displaying properly.
Best Practices for Featured Content:
-
Compelling Headlines: Use clear, descriptive titles that grab attention
-
High-Quality Images: Upload professional, relevant images for better visual appeal
-
Detailed Overviews: Write informative descriptions that highlight the value of your content
-
Proper Categorization: Select accurate categories to improve discoverability
-
Regular Updates: Keep your featured content fresh and current
-
Value-Focused: Share content that demonstrates your expertise and provides value to potential clients
Content Types You Can Feature:
-
Case studies and success stories
-
Whitepapers and research reports
-
Industry insights and articles
-
Video presentations and demos
-
Infographics and visual resources
-
Webinar recordings
-
Product documentation
-
Testimonials and reviews
Your featured content is now live on your Insight Guide listing and will help demonstrate your expertise to potential clients!
Note: Placeholder text for images - actual screenshots should be inserted at each marked location showing the specific interface elements mentioned in each step.
Adding multiple locations or branches to your listing helps potential clients find your services in their area and demonstrates your business reach. Follow these steps to add locations/branches to your listing.
Step 1: Access Your Listing Settings
Navigate to your listing page and click the Gear icon (settings icon) to edit and manage your listing.
Step 2: Navigate to Locations/Branches Tab
Once in the settings menu, locate and click on the "Locations/Branches" tab to access the location management section.
Step 3: Start Adding New Location
In the Locations/Branches section, click the "Add New" hyperlink text to begin adding a new location or branch to your listing.
Step 4: Complete Location Information
A pop-up window will appear allowing you to add your location/branch details.
Step 4a: Select Country
Click on the country dropdown menu and select the country where your location/branch is situated.
Step 5: Search and Select Address
Step 5a: Search for Address
In the address search field, start typing the address of your location/branch. The system will provide suggestions as you type.
Step 5b: Select Correct Address
From the dropdown suggestions that appear, click on the correct address that matches your location/branch.
Step 6: Save Location
After selecting the correct address, click the "Save" button to add the location/branch to your listing.
Step 7: Verify Location Addition
Return to your Locations/Branches tab to confirm that your new location has been successfully added and is displaying with the correct address information.
[Image: Screenshot showing the newly added location in the Locations/Branches list]
Step 8: Add Additional Locations (Optional)
To add more locations or branches, repeat steps 3-6 for each additional location you want to include in your listing.
Step 9: View on Listing
Check your public listing to see how your locations/branches are displayed to potential clients.
Tips for Adding Locations:
-
Accurate Addresses: Ensure you select the exact address to help clients find you easily
-
Complete Information: Add all your business locations to show your full service area
-
Verify Details: Double-check that each location displays correctly on your listing
-
Regular Updates: Keep your locations current if you open new branches or close existing ones
-
Strategic Locations: Include all locations where you provide services or have physical presence
Benefits of Adding Multiple Locations:
-
Improved Local Search: Better visibility in location-based searches
-
Client Convenience: Helps clients find the nearest location to them
-
Business Credibility: Demonstrates your business scope and presence
-
Geographic Coverage: Shows the areas you serve
-
Enhanced Discoverability: Increases chances of being found by local clients
Your locations/branches are now successfully added to your listing and will help potential clients find and connect with your business in their area!
Adding member pricing and resources to your listing provides exclusive benefits to RSA members and helps build stronger relationships within the community. Follow these steps to add pricing/resources to your listing.
Step 1: Access Your Listing Settings
Navigate to your listing page and click the Gear icon (settings icon) to edit and manage your listing.
Step 2: Navigate to Pricing/Resources Tab
Once in the settings menu, locate and click on the "Pricing/Resources" tab to access the member perks management section.
Step 3: Start Adding New Pricing/Resource
In the Pricing/Resources section, click the "Add New" button to begin creating a new member pricing or resource offer.
Step 4: Complete Basic Information
A pop-up window titled "Create Member Pricing/Resource" will appear. Fill out the following required and optional fields:
Step 4a: Enter Pricing/Resource Name
Add a clear, descriptive name for your pricing offer or resource.
Step 4b: Set Expiration Date (Optional)
If your offer has an expiration date, enter it in MM/DD/YYYY format. Leave blank if the offer has no expiration.
Step 4c: Add Description
Write a detailed description of what you're offering, including any benefits, discounts, or resource details.
Step 5: Configure Terms & Conditions
Step 5a: Select Confirmation Type
Choose between two options for what happens when someone claims your offer:
-
Custom Confirmation Message: Display a custom message to the user
-
Redirect Link: Redirect users to a specific URL
Step 5b: Select Notification Recipients
Choose which users will receive notifications when someone claims this pricing/resource offer.
Step 6: Setup Pricing & Resources Permissions
Configure who can view and claim your pricing/resource offers. By default, anyone can see what you're offering, but only RSA members can claim offers.
Step 6a: Configure View Permissions
Who can see the Pricing/Resource name and description:
-
Select "Everyone" to make it visible to all visitors
-
Select "Members Only" to restrict visibility to RSA members only
Step 6b: Configure Claim Permissions
Who can access/claim the Pricing/Resource:
-
Select "Everyone" to allow anyone to claim the offer
-
Select "Members Only" to restrict claims to RSA members only (recommended)
Step 7: Upload Supporting Files (Optional)
If you have documents, images, or other files related to your pricing/resource offer, upload them using the file upload section.
Step 8: Save Your Pricing/Resource
After completing all fields and configuring permissions, click "Save" to add the pricing/resource to your listing.
Step 9: Verify Pricing/Resource Addition
Return to your Pricing/Resources tab to confirm that your new offer has been successfully added and is displaying correctly.
Step 10: Manage Existing Pricing/Resources
From the Pricing/Resources tab, you can edit, disable, or delete existing offers as needed.
Configuration Settings
There were no global configurations
There were no listing caption configurations